Adding Constants

The calculator permits injection of code, whenever you switch to the calculator tab.

In this section, we’ll use injection to inject a table of constant definitions into the calculator, making them usable regardless of the current user folder. We’re going to make a proper “extension”.
If you’re looking at getting the job done and aren’t curious about how this works internally, skip, or just glance over, the remainder of this section. A subsequent section is going to automate what we’re doing here, giving you a tool that removes the drawback of the previous approach.
Note: The following is not hard to do, but you’re leaving “user-land” and entering “programmer-level”.
First, just a little bit of background:
JavaScript functions defined in a given folder can access variables of that folder just by referring to them by their name (unless, as is the case above, the name is not a legal JavaScript name). So, you normally don’t have to worry, or know, where the variables are *really* stored.
That is, “function() { return A; }” will happily return the contents of A, if A is defined in the current folder.
How this works is fully explained in the JavaScript API document.
This document also explains where the real location of variables are, and how to access them.

This, and injection, is all we need.
Injections are hidden from users, because they’re considered internal, and improper use can render the calculator useless (until you fix your offending injection code).
Since you went this far and are now unstoppable, let’s forgo another warning disclaimer and proceed to turn them on: Quit the app, go into Settings, find ND1 (or ND0), and turn on ‘Show JS Injections”. Go back into the app.
Tap the Definition tab.
Scroll all the way to the bottom and tap Injection.
Tap Edit
Ignore any preexisting code, and type this as the first line:

(As you don’t have ‘α’ on your keyboard, getting this entered may be a little painful. You have to first copy the character, then paste it here. We’re not going to end up using this, so you may substitute α for any other name. Just type a small letter ‘a’, if you wish.)
Tap Done
Tap ND1 (or ND0).
Tap the ND1 (or ND0) tab.
You now have a customized calculator, that knows about ‘α’ (or ‘a’), no matter in which folder you are.
Notice that our new definition is not an expression, but the numerical result for 1 divided by 137. This is for illustrative purposes. We could have defined it as before by typing calculator.vars[“α”] = “‘1/137.0599967994’” (note, though, the double-quotes around single-quotes).
First, let’s try the variable in the ‘Constants’ folder.
Enter

to get

Oops.
This looks like our old definition. And it is. This is by design: If there’re two definitions for the same variable, the one defined in the current folder will govern.
Switch to any other folder (for example, My Vars).
Now enter the variable name again (or just tap last), and you’ll get

So. The variable is defined, and from this result you can tell it’s the new (numerical) definition, which we gave it in the injection, that governs.
You can now use ‘α’ (or ‘a’) just like ‘e’ or ‘π’ (or ‘pi’) and the others documented here.
You could go ahead and add as many constants as you wish in this fashion.
calculator.vars[“h”] = ...
calculator.vars[‘c”] = ...
etc.
There’re two problems with that, though:
-
-if you’re entering a lot of data, you’d probably rather do this on your computer
-
-you cannot save or share your table
Enter the ‘inject’ command.
Inject is a command that will take a Code object (containing JavaScript) and a name from the stack, and inject the object into the calculator.
It’s very easy to build a Code object: just type /**/ followed by JavaScript code on the edit line.
This

becomes

on the stack.
If you want to enter more than one line of code, you always expand the edit line first, by double-tapping.
Here’s how the beginning of a constant list Code object could look like
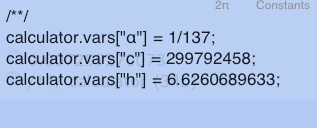
As you enter this (from an expanded edit line, always enter directly; do not double-tap, or you lose your newlines), you get

(On the stack, the code object shows you the beginning characters, followed by the byte size.)
Go back into the ‘Constants’ folder and store this code object as a variable named ‘injection’. (This name is not important, but chosen to follow MorphEngine extension conventions.)
That is, type ‘injection

and tap →⊛ (STO)
If you look at this variable in the database, it looks like this:

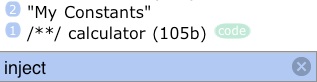
Let’s specify a name for your extension and inject this code.
Enter “My Constants”
And tap the new injection soft-key.
Your screen should look roughly like this

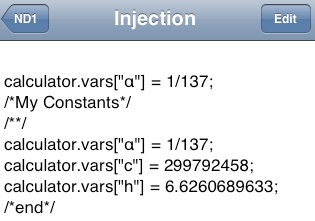
Now type “inject”
and Enter.
If you now switch back to the Injection page under Definition, you’ll see
Switching back to the calculator, you can see that the new constants are available for use in every folder.
By using the Code object and ‘inject’ we gained that
-
-you can now use your constants in every folder
-
-you can now use data exchange and work on your list on your computer. Not only will Unicode characters be easier to come by there, and typing in general be much easier. You can also find ways to make a batch conversion of constants. As you’re injecting JavaScript, *any* JavaScript, you don’t have to assign your constants one by one, as we did. If you know JavaScript, you could take a table of names and values, and write a for-loop to populate the calculator.vars object from it.
You also gained
-
-management of your injection, incl. safe removal, and
-
-share and install ability
though we have yet to see how.
For right now, switch back to the Injection page, Edit, and delete the entire text shown in the last screenshot.
Tap Done.
Overview
In this tutorial, we see how to make a list of constants and add them to the calculator. The goal is to have them behave like built-in constants, such as ‘π’ and ‘e’. We’ll also build a custom menu, so we can retrieve them conveniently.
Beyond the immediate task at hand, this tutorial shows you how to
-
-calculate numerically or symbolically; and set up a variable for either use
-
-use a variable defined outside the program, in RPL or JavaScript
-
-use a pure Unicode variable name in JavaScript
-
-use code injection
-
-build an extension, and provide an install “script”
-
-reach into the global namespace of the calculator
-
-do a custom menu, and place custom keys on the menu popup


(c) 2010 Naive Design. All rights reserved.
Two approaches, plus one
There’s two basic approaches we can take:
- add each constant as an entry in a folder
-
-inject a table of constants
We’re exploring both approaches, and then see how both can be combined for, possibly, the best solution.
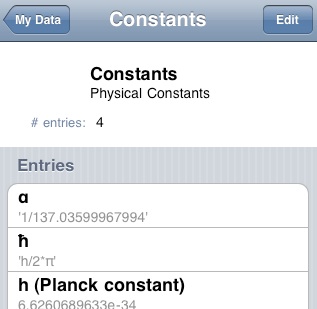
One database entry per constant
Create a new folder called “Constants”.
Add a database entry for each constant you want. You can use Unicodes for their names (as per Using Unicodes).
For example, create entries like this
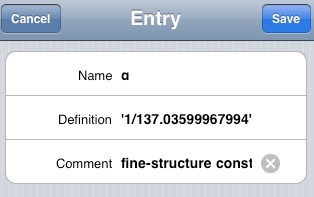
(Note, the use of an expression as the constant's definition.)
to arrive at a list like this:
Back in the calculator, slip into the ‘Constants’ folder. You can now use your constants:
Simply tapping the a constant’s soft-key (or entering it on the edit line) will recall its contents:

If you type it in an expression,

it will be preserved as symbol until evaluation.

That is, if you want to use it by itself as symbol, precede its name with the Expression/Name-key:
Enter

to get

(One way to look at it, the “name” of a variable is an expression containing just itself.)
Subsequent computation, then, will happen symbolically until you evaluate:
Enter 4
Tap *

You may have noticed that if entered through their respective keys, i and π appear symbolically, while e enters numerically. (Note: These three keys are only present on the standard keyboard in Modern mode. In Classic mode, there’s only a key for π.)
If you look in the definition of these keys, you’ll see that the symbolic appearance by default is achieved simply by putting the constant in quotes.
That is, the definition for the π-key is ‘π’ (Pi in quotes), whereas the definition for the e-key (which doubles as scientific notation exponent-key) is simply e (e not in quotes).
If you want to put any of your constants on calculator keys, you’d follow the same practice.
What you probably really want for your constants is a custom menu, so you have them all at quick disposal. A menu gives you a “second level of indirection,” permitting you to use the same practice to have constants appear symbolically or numerically. We’ll do this later.
You can also use your constant in programs:
This RPL program, for example, entered as

yielding

will work just fine.
Tap ⌘ (Eval)

Tap ⌘ (Eval)

Note, we evaluated in two steps, where step 1 first resolved your constant. To do the evaluation in one go, tap →NUM in Classic mode, instead of EVAL. (In Modern mode, there’s no key for this, but you can achieve the same by entering @toNum on the edit line.)
The equivalent JavaScript function, entered as

would return, when stored and run, the expected result, *if* this syntax weren’t illegal: In JavaScript, variables cannot start with a Unicode character. There is a solution to this, and we’ll look at this special case in just a bit.
It goes without saying: since your constants are supported in expressions, they’re usable for graphing.
There’s, however, one problem with the approach thus far: your constants are available only if your current folder (as displayed in the upper right) is your ‘Constants’ folder.
Injection
The best of both worlds
In this section, we’re pulling together the “one-entry-per-constant-in-the-database” approach and what injection bought us.
Specifically, we keep the initial approach, but solve the problem of our constants being only available in our folder.
Note: it’s perfectly viable to have our folder only consist of an injection with install support, as per the preceding two sections. For your own collection of data this might be the best approach, and you may skip this section.
Having one entry per constant in the database was nice because it allowed the user to browse the constants, maybe remind themselves of what they are by looking at the Comment field, delete unneeded ones, etc.
What about not actually injecting data but instructions that blend all the constants of our user folder (‘Constants’) with the calculator’s pre-existing constants?
This is accomplished with the following bit of JavaScript code (that assumes just one more bit of knowledge of the MorphEngine JavaScript API. Namely, that your folder’s data is stored in calculator.vars[“Constants”]):
/**/
(function () {
var excludedNames = ["Install", "Uninstall", "\u2338", ".injection", “clone”];
var constants = calculator.vars["Constants"];
for (var name in constants)
if (excludedNames.indexOf(name) == -1)
calculator.vars[name] = constants[name];
})();
Note: \u2338 is the JavaScript way to specify Unicode 0x2338 (= 9016, decimal) for ‘⌸’. Given the decimal number, the calculator will tell you the hexadecimal number, if you type “toHex”. But you knew that already...
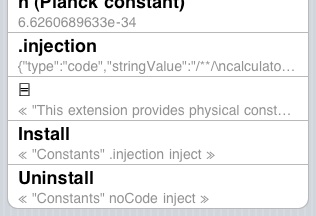
Type this into an expanded edit line and enter it; this will create a Code object
Store as .injection
Tap Install
Switch out of and back into the calculator (this causes the injection to take effect)
Your constants will be usable from every folder now.
A nice side-effect of this (hybrid) approach: As you add (or remove) constants, these will automatically become available without that you have to re-install.
Technical notes: 1) The code above is a closure, so as not to pollute the global name space. 2) As you read “/**/” makes this a Code object (think of it as a “code payload”). Without the “/**/” and closure decorations, the calculator would create a JavaScript function that you could store and run (but not inject). In that case, a syntax check would be performed. This, and being able to run it, is useful during development.
‘Install’ conventions for extensions
MorphEngine extensions follow a few simple conventions:
-
-there’s a Code object named ‘.injection’
-
-there’s an ‘Install’ program that does the injection
-
-there ought to be a ‘Uninstall’ program which undoes the injection
-
-there should be a Read Me, commonly titled ‘⌸’ (Unicode 9016)
The injection is our Code object from the previous section, containing JavaScript that assign values to new names in the global calculator.vars object.
The Install program commonly looks like this:
≪ "NameOfExtension" .injection inject ≫
That is, it performs the steps we performed manually in the previous section.
The Uninstall program commonly looks like this:
≪ "NameOfExtension" noCode inject ≫
‘noCode’ is a constant Code object that contains... no code.
Running this program will remove your injection.
The Read Me usually just tells the user what the extension, or install, does.
Ours might look like this:
≪ "This extension provides 83 physical constants for your use in formulas and programs. Tap install to install."
alert ≫
As far as ordering in the database folder
- the Read Me is commonly the first entry
- the injection is insignificant to the user, so it should be the last entry entry. It is hidden automatically in v1.3 and up due to the leading “.” (dot) in the name. (This is the reason for this name.)
-
-‘Install’ and ‘Uninstall’ precede the injection, unless there’s a large number of other entries in the folder, in which case they should appear directly after the Read Me
Create these entries now. (Borrow the ‘⌸’ name from another extension or enter 9016 and enter ‘unicode’, pull the resulting character on the edit line and precede with a single quote before entering again, to use it as a name).
You should end up with something like this:
If .injection contained definitions for all the constants you’re interested in, you could delete the previous “loose” constant entries in your folder, and be done.
Before you go off doing this, though, see if the approach suggested next makes more sense for your application.
Custom menu (and keys)
Finally, let’s put some (or all) of your constants into a custom menu: for easy access, and to make that our constants enter symbolically.
This is easily done:
Switch to Definition
Tap Edit
Scroll to the bottom and tap Add Menu
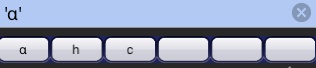
Enter your constants, like this:
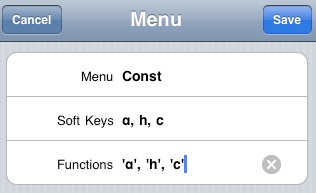
In the Soft Keys field, enter the constants’ Unicode characters (or character sequences), separated by commas.
In the Functions field, do the same. Quote each constant that you want to have entered symbolically.
There’s limit to the number of constants you can add like that.
Tap Save
Now, if you switch back to the calculator and press the Menu key, you’ll get something like this:
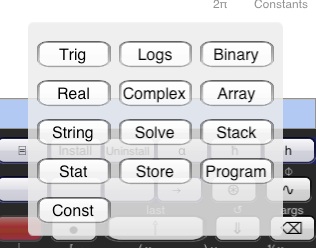
If you tap Const, you get soft-keys with your constants and when you tap those, they’ll enter as symbols:
And, as you know, they work no matter in what folder you are. Use them in expressions as you like.
Now, you may have some very important constants that you use all the time, and for which you desire even quicker access.
Go back to Definition, Edit, Add Menu and enter this:
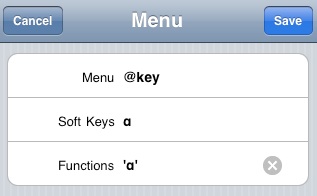
Note, the menu title “@key”.
This is special. We’re not creating a menu here, actually. We’re defining a key that will appear on the menu popup.
Only one entry will be used in the Soft Keys and Functions fields now.
Do this for another of your constants, and then arrange the order like so:
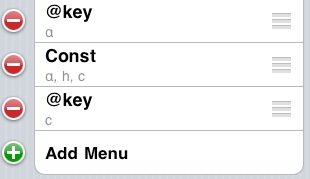
(You re-order by dragging entries by their right-hand side handles.)
Now switch back to the calculator and tap the Menu-key.
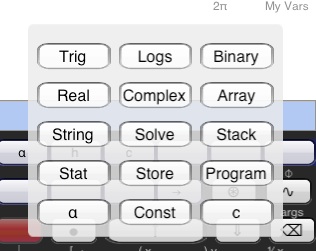
Not only do we have two new keys, but we also repaired the esthetics of the menu popup.
Try out the new keys.
The pop-up will grow as you add more menus or keys. So, you could fit quite a few of your favorite constants.
The @key definition trick works for any kind of object. You could also put your favorite functions, or links, or data on menu pop-up keys.
That’s it. You successfully added constants to your calculator and gave yourself convenient access to them.