Coding remotely (MorphEngine v.1.4.1)

You can set up a link between your computer and the calculator, allowing you to write code remotely and run it on your mobile device. There’re three methods for that, described here.
The methods work both for JavaScript and RPL+ code (as well as data such as text, numbers, matrices, etc.).
The methods are not mutually exclusive. That is, you can be set up to use all three methods.
The recommendation is to start with method #1.
Overview
(c) 2012 Naive Design. All rights reserved.
This method allows you to write code on your computer and run it a split-second later on your device. You’ll only need to press a single key to get and run the remote code.
Conceptually, this is how it works:
-
-you set up a local web server on your computer
-
-you create a key (or menu item, or menu key) that will get and run a dedicated file from your server, using a special command
-
-you use a text editor of your choice, write your code, and save it into a folder served by your computer
-
-once setup, all you do to get and run your remote code is tap the dedicated key on your device
One-time setup:
Here’re the steps to get you set up:

On a Mac, launch System Preferences, click Sharing, and enable Web Sharing.
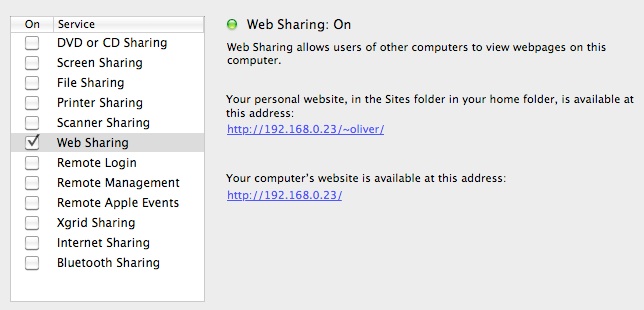
Take note of the address reported on the left side of the panel. You will need it for the next step.
On a PC, if your Windows license includes it, go to Services and start the IIS service.
More information on this can be found here: http://blogs.msdn.com/b/rickandy/archive/2011/03/14/enabling-iis-7-x-on-windows-7-vista-sp1-windows-2008-windows-2008-r2.aspx
If your copy of Windows does not include IIS, you can install Apache, the world’s most popular web server.
On a Linux machine, get, install, and enable Apache, or any other HTTP server.

In ND1,
get the Tools downloadable folder:
-
-tap the My Data tab
-
-scroll to the bottom of the list
-
-select Shared Folders
-
-pick Tools from the list of available folders. (If it doesn’t appear, you already have it.)
create a dedicated key that will get and run your code:
-
-tap the ND1 (or ND0) tab
-
-tap the shift-key and space to get the ≪ character
-
-type “ and the address from the previous step followed by a file name of your choice and the command Tools.getCodeAndRun. The complete line may look like this:
≪ "http://192.168.0.23/~oliver/test.js" Tools.getCodeAndRun
-
-Enter, to get the ≫ closing character
-
-tap the Edit key (shift - ‘) to get the completed text line back onto the edit line
-
-tap and hold anywhere on the edit line to get the Copy/Paste pop-up:
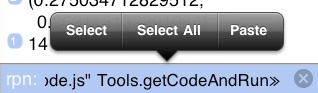
-
-tap Select All
-
-tap Copy
-
-tap the Definitions tab
-
-scroll to the bottom of the list
-
-tap the Edit button
-
-tap Add Menu
-
-enter the following
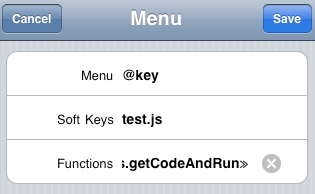
Type @key for Menu. This creates a menu key, instead of a regular menu.
Type the desired filename (or whatever text you’d like to see on the key that will get and run your remote code) for Soft Keys.
Paste the command line you copied before into the field for Functions. It should read something like this:
≪ "http://192.168.0.23/~oliver/test.js" Tools.getCodeAndRun ≫
-
-tap Save
-
-tap Done
This completes one-time setup.
Verify that your menu key has been created, by switching back to ND1 (ND0) and tapping the menu key.
You should see this:
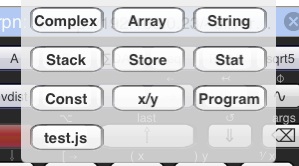
A new key appears among the previous menus.
Since it was declared as @key, it’s really a key, not a menu.
When you tap it, the associated action will be triggered. In our case, an small RPL program will be started that pushes the URL to your code onto the stack and then runs the command getCodeAndRun from the Tools folder.

Write a program using a text editor of your choice.
For example,
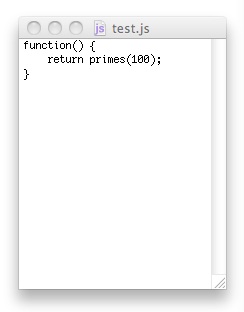
Save your program in the folder that corresponds to the URL given in the previous step. On Mac, for example, this would be the Sites folder in your home directory. Save your code under the file name you specified in the URL (here: test.js).
If you have a choice of file formats to write, choose UTF-8 (preferred) or ASCII.
If you write RPL+ code, you won’t have easy access to some special characters. That’s not a problem. Use the following transcode character sequences (trigraphs) instead:
\<< for ≪
\>> for ≫
\-> for →
\<> for ∠
\pi for π
>= for ≥
<= for ≤
!= for ≠
\^| for ↑
\v| for ↓
These will be converted automatically upon import.
For example, this RPL program
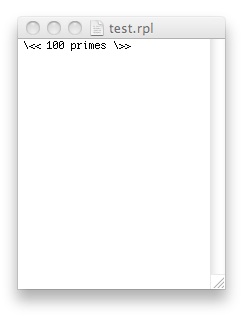
would do the same as the JavaScript program above. Notice, the use of a different extension.

Back in ND1, tap the menu button and the button you created.
If you typed the program shown above, you should get this on your stack:

The primes below 100, as per your program code.
Also, a new soft-key corresponding to your filename will have been created in the current folder (here: test).
You can re-run your program by tapping that key. You can switch to editing the program on the device now, if you wish. Or you can continue to code your function on the computer.
Use:
Whenever you’re done editing a new version of your code on the computer, press the dedicated button to get and run the code. Supposing you have a local network, there should be practically no discernible lag between tapping the key and starting the program.
If your program/function expects input values they will come, as always, from the stack. Any outputs, of course, go to the stack.
You can store the code on your device under a different name, and thereby re-use one filename to contain whatever code you’re currently working on. If you work on multiple functions at the same time, you may create multiple buttons with different URLs. Or, see method #2.
Trouble-shooting:
If nothing happens when you tap your dedicated key, most likely your URL is incorrect or your web server is not set up correctly. You can easily test this out:
In ND1,
-
-paste the mini-program you still have in your paste buffer from before, onto the edit line
-
-click into the edit line and trim the beginning and end of the program, leaving only the URL (w/o the double-quotes)

-
-Enter
You should see your source code displayed.
Double-tap, or tap the circle, to go back.
If nothing displays, or you’re getting an error message, you know the URL (and web server setup) is wrong.
If so, correct the URL (and/or your web server setup), until this works.
Once you have figured out the correct URL, copy it, and edit the menu key you created, and replace its URL with the correct one (erase the previous URL; paste the correct one).
Beware of dynamic IP addresses! If your key works one day but not the next, most likely the IP address on your server changed. This is a network configuration issue, which can be addressed by using a static IP assignment, or using a working server name (such as Bonjour name), instead of a server IP address, in the URL.
#1: getAndRunCode

Methods number #1 and #2 are one-way (computer to device) and move one file at a time.
Method #3 is to set up a custom server for two-way access, and uses the built-in folder sharing ability in ND1 to exchange, in either direction, the contents of an entire ND1 folder.
This permits you to transfer hundreds of functions at the same time, with a press of the Download or Upload button. This method is described in detail here: Custom Server Setup.
An implication of using this method is: you have to deal with JSON data. You will need a JSON editor. You will probably want to keep writing code in your usual editor, but then need a JSON editor to make it into JSON.
An advantage of this method is that, if you’re properly setup, you can automate steps and transfer big amounts of data (such as large matrices) and code, still with the press of one button.
#3: Custom server setup
The Visit key, ⊛⇩ (Classic: VISIT), is used to display the contents of a variable. If you have a program stored in a variable, using this key is an alternative means to displaying it. (The principal means is to tap shift and then the variable’s/program’s soft-key. Or, more simply, press and shortly hold the soft-key.)
The Visit key takes one input/argument: the name of the variable to be visited/inspected.
This method is for changing the Visit key so that it will get remote code from a file on your computer, instead of a local variable. Since the original key function is somewhat redundant, as the press and hold soft-key method is faster and easier and serves the same purpose, repurposing this key makes sense. You could, however, apply this treatment to any other key, or create a new key (or menu item, or menu key) for this purpose.
The steps are almost the same as for method #1. You need to get a remote web server working. Please follow the steps above, if you haven’t done so yet.
The difference is in the creation of the dedicated key. You don’t create a menu key.
Instead, you
-
-find the definition of the ⊛⇩ (Classic: VISIT) key on the Definitions page. It’s listed under Keys just before the number 1.
-
-tap Edit
-
-tap on the key; you will see this:
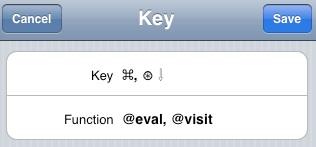
Each key lists the keycap (its visible name) in the Key field, and the associated action/function in the Function field.
If there’s a second (shifted) key and function, these appear after a comma.
So, this here is the definition for both the Eval and Visit keys.
-
-replace the @visit text with this text:
≪ "http://10.0.1.3/~me/" Tools.getCode ≫ (adjust this text to match your environment and user name)
Follow the method above to get the ≪ and ≫ characters. (That is, prior to creating the key enter the text on the edit line, enter it, edit it, select and copy the text, and then paste it here.)
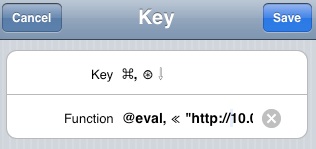
The text is truncated in the screenshot. Note, the comma between @eval and the new action
-
-tap Save
-
-tap Done
The completes the one-time setup.
Use:
On your computer, write code (JavaScript or RPL+ or data) and save it in the folder that corresponds to your URL.
Important: Give it a .txt extension.
To access your remote file from ND1, do the following:
-
-Type and enter the name of the file, without the extension. You need to enter it as a proper name, that is, you start it with the Name (‘) key. For example:

-
-Enter (optional)
-
-tap the Visit key (shift-⌘) (remember the quickest way to do this is to press and hold for a brief time, the Eval key)
You should now see the contents of your file displayed in the multi-line editor (if it contains newlines) or the edit line (if it contained just one line of text).
If you write RPL+, use the transcode character sequences mentioned in #1 to get the special characters you need.
The advantage of this method over #1 is that you can access multiple files without that you have to create multiple buttons. The disadvantage is that you have to provide a name. You can be set up to use both methods. Use #1 for quick iteration on one function. Use #2 to access a broader set of files that see less change.
Changing the behavior:
If you wish to the change the expected file extension to something other than “.txt”, or get the remote code but not display it, or run the code instead of displaying it, you can easily adapt the getCode function in Tools to do so.
See this forum thread for more information: http://forums.naivedesign.com/viewtopic.php?f=7&t=246
#2: Modify the Visit key